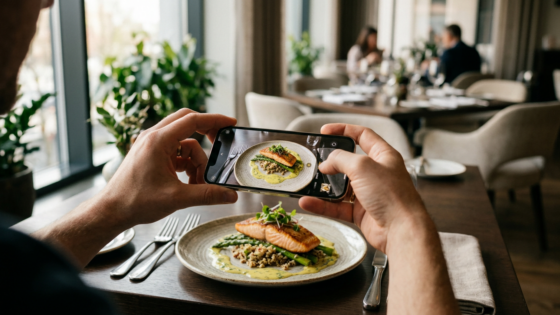
Your food is the product. But what convinces a customer who’s never visited your restaurant to click “Order Now” is a photograph. In an era when most customers browse menus on their phones before deciding where to eat, the quality of your food photos is doing more sales work than you might realize — and in most cases, a decent smartphone and the right technique is all you need to compete.
This guide covers the practical skills any restaurant owner or staff member can apply today: how to light the shot, how to set up the frame, how to style the dish, and how to do quick edits that make the difference between a photo customers scroll past and one that makes them hungry.
Key Takeaways
- Natural light is the single most important factor in food photography — and it’s free.
- Menus with food photos can increase item orders by 20–44%, according to multiple industry studies.
- Your phone’s camera is more than capable — the gaps are in lighting, composition, and editing, not the device.
- Start with your top 10 sellers and highest-margin dishes — don’t try to photograph everything at once.
Why Food Photography Directly Affects Your Revenue
Before getting into technique, let’s establish what’s at stake. According to FoodShot, restaurant menu photography increases sales by 20–45% and boosts online ordering conversions by 25% or more for menus that include food photography versus text-only menus. A separate data set from DoorDash showed that menus with item photos get up to 44% more orders than those without. These are not small increments — they’re the difference between a profitable month and a marginal one.
The numbers make sense intuitively: customers who order online or over the phone can’t smell your kitchen or watch a dish being carried past their table. A photo is the closest thing to that experience. Without one, the customer is making a decision based on text alone — and text rarely triggers appetite the way a well-lit image does.
The Most Important Skill: Lighting
If you only take one thing from this guide, make it this: light your food with natural light, from the side. Everything else is secondary.
Use Window Light, Not Flash
Place the dish near a window on a bright but overcast day, or next to a window where indirect sunlight comes in. Natural light provides soft, flattering illumination that enhances colors and brings out textures in a way that overhead restaurant lighting and phone flash simply cannot replicate. Phone flash creates harsh, flat light that makes food look pale and lifeless. Turn it off.
Direct sunlight creates strong shadows that cut across your dish and create harsh contrast. You want diffused light — either a cloudy day, or position yourself so the sunlight comes in through a window but isn’t hitting the dish directly. A piece of white paper or a white foam board placed on the opposite side of the dish from the window acts as a reflector, bouncing light back to fill in shadows.
The Side-Lighting Advantage
Light coming from the side, rather than directly above or in front, creates depth. It catches the texture of a crispy skin, the sheen of a glaze, the steam rising from a clay pot. Front-facing light (like a flash) flattens the dish. Side light sculpts it. For most dishes, position the window to your left or right, shoot from above or at a 45-degree angle, and let the side lighting do the work.
Avoid Mixed Light Sources
One of the most common mistakes in restaurant food photography is mixing light sources — natural light from a window combined with warm overhead fluorescent or incandescent bulbs. The camera struggles to balance the color temperature, and the result looks unnatural. When shooting, turn off any artificial lights near your setup and rely entirely on the window.
Composition: Angles, Framing, and the Rule of Thirds
How you frame the shot is the second major variable. Most phone cameras now include a grid overlay option — enabling it shows two horizontal and two vertical lines dividing the frame into thirds. The rule of thirds says that placing your main subject at or near one of the four intersection points creates a more naturally pleasing composition than centering everything.
The Best Angles for Different Dishes
| Dish Type | Best Angle | Why |
|---|---|---|
| Plated entrées (stir-fry, braised dishes) | 45-degree angle | Shows depth, layers, and height of the dish |
| Flat dishes (dumplings, dim sum, appetizers) | Overhead (flat-lay) | Reveals the full spread and arrangement |
| Soups and hot pots (clay pot dishes) | Slight angle, 30–45 degrees | Shows steam, surface, and depth without distortion |
| Tall dishes (whole fish, towers) | Eye-level or slight angle | Communicates height and presentation drama |
| Close-ups (dumplings, fried items) | Macro (close, slight angle) | Shows texture, crispiness, and filling detail |
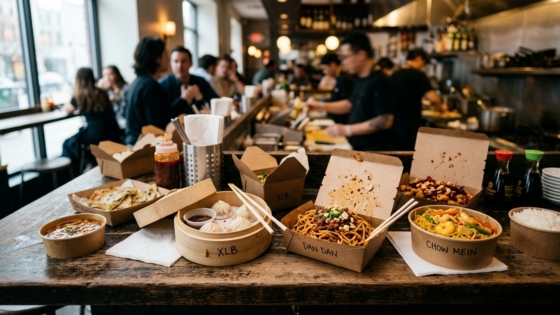
BentoBox notes that close-up shots work especially well for items like dumplings and fried dishes, where the texture and detail of the exterior are key selling points. A close-up of a golden-brown potsticker with crispy edges tells the customer exactly what they’ll get — no description needed.
Keep the Background Simple
The background should never compete with the food. Dark slate, white marble, light wood, and plain linen all work well. Avoid cluttered tablecloths, complex patterns, or backgrounds with other people or kitchen equipment visible. UpMenu recommends keeping backgrounds consistent across your menu photos — using the same surface and angle for similar categories creates a cohesive, professional feel even if you’re taking photos over multiple sessions.
Styling: Making the Dish Look Its Best
Food styling doesn’t mean making food look fake or artificially perfect. It means presenting the dish the way it looks at its best — before steam causes condensation, before sauces spread, before garnishes wilt.
Shoot Fast
Most food has a window of 2–5 minutes where it looks its best after plating. Steam is present, colors are vibrant, nothing has settled or separated. Have your setup ready — background, lighting, phone on a tripod if possible — before the dish comes out of the kitchen. Take 15–20 shots in that window, then choose the best one.
Garnish and Color Contrast
A sprinkle of fresh scallion, a few drops of chili oil, a small cluster of sesame seeds, or a sprig of cilantro placed just before the shot adds color contrast and visual life without changing the dish. DoorDash’s photography guide recommends using a few props and garnishes to add color while keeping the overall look natural and aligned with what the customer will actually receive. Never over-style a dish to the point where it no longer matches what comes out of the kitchen — the mismatch erodes trust.
Clean the Plate and Rim
Before shooting, wipe any drips or smudges from the rim of the bowl or plate. Sauce splatters that are invisible during service become distracting in a close-up photo. A quick wipe with a clean cloth takes 10 seconds and meaningfully improves the shot.
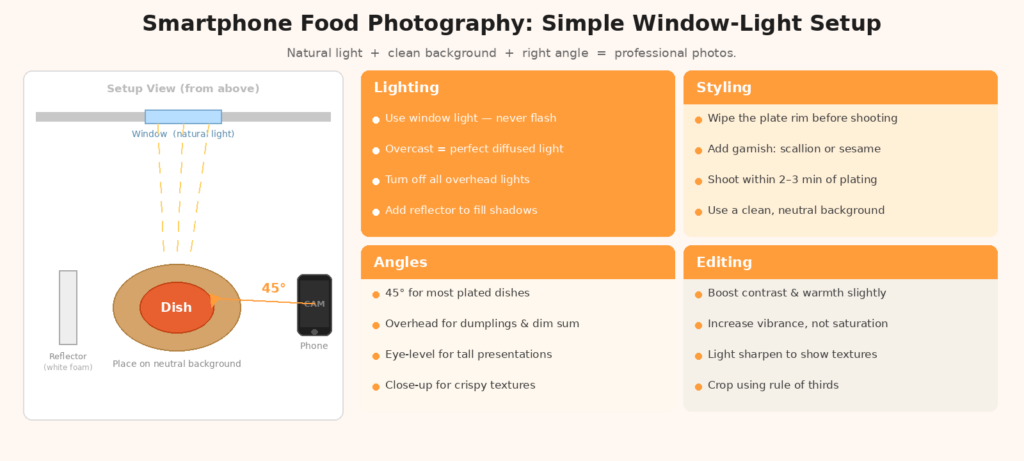
Editing: Small Adjustments, Big Difference
You don’t need Photoshop. The editing tools built into your phone’s Photos app — on iPhone or Android — are more than sufficient for food photography. The goal is enhancement, not transformation.
The Key Adjustments
In your phone’s photo editor, work through these in order:
- Exposure: If the image looks dark, brighten it slightly. If highlights are blown out, pull back.
- Contrast: Increase contrast to make textures pop and the dish stand out from the background.
- Warmth/Temperature: Shift toward warmer tones (slightly orange/yellow) to make food look more appetizing. Cold blue tones tend to make food look unappetizing.
- Saturation/Vibrance: A modest saturation increase makes colors more vivid and appealing. Don’t overdo it — saturating past the point of natural-looking color makes the image feel artificial.
- Sharpness: A light sharpening pass brings out the detail in textures, especially useful for crispy or crunchy items.
GetSauce notes that posts with high-quality food images receive up to twice the engagement on Instagram and other platforms, which compounds over time into visibility and discovery for your restaurant. The editing step is where a decent photo becomes a shareable one.
Where to Use Your Photos
Once you have a set of quality images, deploy them consistently across every customer touchpoint:
- Online ordering menu — priority deployment; photos here directly affect conversion
- Google Business Profile — frequently updated photos improve local search visibility
- Delivery platform listings (DoorDash, Uber Eats) — follow each platform’s photo specifications
- Instagram / Xiaohongshu — recurring photo content for organic discovery
- Printed menu — use sparingly (one or two signature items); too many photos on a print menu can cheapen the feel
Prioritize by Revenue Impact
Don’t try to photograph all 80 items at once. FoodShot recommends starting with your top 10 sellers and highest-margin items — these will generate the most return on the time you invest. Once those are done, work through the rest of the menu systematically over a few weeks. Keep the sessions short (30–45 minutes, 5–8 dishes) to maintain consistency in lighting and energy.
Frequently Asked Questions
Do I need a special lens or attachment for my phone?
Not for most food photography. Modern flagship smartphones (iPhone 14 or later, recent Samsung Galaxy) have cameras with enough resolution and optical quality for menu and social media use. A small tabletop tripod (around $15–$25 online) is the most useful accessory — it keeps the phone steady for consistent shots and lets you shoot without someone having to hold it. A $10 ring light adds versatility for evening shots when natural light isn’t available.
How do I photograph dishes that don’t look visually impressive?
Angle, garnish, and context. A bowl of plain congee shot from directly overhead doesn’t look like much. Shot at a slight angle with a visible sprinkle of ginger, scallion, and a soft-boiled egg on top, it tells a story. For monochromatic or visually flat dishes, add a single contrasting garnish and shoot closer to highlight the texture of the surface.
Should I hire a professional photographer?
For a full menu redesign or major seasonal launch, a professional can be worth the investment ($500–$2,000 for a session covering 10–20 dishes). For ongoing menu additions, social media, and online ordering updates, a consistent DIY approach with your phone is more practical and keeps your visual content fresh without scheduling constraints.
Great photos bring customers in. Every call should be answered. Tunvo AI handles inbound phone orders in English and Mandarin, 24/7, and pushes orders directly to your MenuSifu POS. Start your 15-day free trial or book a quick demo.